First, let's lay down some concepts. Platform events can have a variety of subscribers aside from apex triggers. To generically configure the system's behavior for all of these subscriber types, Salesforce thus had to create a separate kind of metadata (in addition to the trigger's metadata definition) to expose configuration settings for platform event subscribers.
This new metadata type is called PlatformEventSubscriberConfig. Unfortunately, at the time of this writing, there is no user interface that allows us to create and edit subscriber configs. Instead, this has to be done through manually creating the XML in VS Code (or a similar editor), then deploying the XML to the relevant org.
Prepare Your Project For PlatformEventSubscriberConfig
The first task at hand is to prepare your local copy of metadata to retrieve and deploy this metadata type. In your manifest.xml, add the following code:
<types>
    <members>*</members>
    <name>PlatformEventSubscriberConfig</name>
</types>

Next you need to create a directory to hold local copies of the new metadata. If your org already has metadata of this type, the directory should be created automatically when you right-click package.xml, and run "SFDX: Retrieve Source In Manifest From Org". If this is your org's first subscriber config, you'll need to create this directory manually.
Find the project subdirectory that contains your other metadata type folders (typically "force-app/main/default". Create a new folder called "PlatformEventSubscriberConfig". The above documentation calls for an upper-case first letter, unlike other directories (like "aura", "objects" etc.). Capitalization may be irrelevant; in my case, using a capitalized directory name (on a macbook) worked as expected. Once this directory is created, your local project should be configured to receive and deploy this metadata type.
Create a New PlatformEventSubscriberConfig
The next step is to create a local copy of your new subscriber config. The first thing here to get right is the filename. The above documentation says that it should "have the suffix .platformEventSubscriberConfig". The full filename suffix however should be ".platformEventSubscriberConfig-meta.xml". The filename prefix can be any valid identifier that you like; a reasonable naming convention might be to use the same prefix as your trigger handler. For example:
eventSystemAction.trigger-meta.xml
eventSystemAction.platformEventSubscriberConfig-meta.xml
Next, open the new metadata file you created, and define the XML for the subscriber configuration. Particular attributes are defined in the above documentation; you can use the following example as a model:
<?xml version="1.0" encoding="UTF-8"?>
<PlatformEventSubscriberConfig xmlns="http://soap.sforce.com/2006/04/metadata">
    <platformEventConsumer>eventSystemAction</platformEventConsumer>
    <batchSize>200</batchSize>
    <masterLabel>eventSystemAction</masterLabel>
    <user>[email protected]</user>
    <isProtected>false</isProtected>
</PlatformEventSubscriberConfig>
Of particular note is the user tag, which changes the running user from Automated Process to [email protected]. This must be a valid username from the org to which you're deploying the metadata. If the org is a sandbox, and the user originated in production, then it will need to have the name of the sandbox appended to the end of the username, as this is what Salesforce does during a sandbox creation / refresh. This will cause a changeset deployment from sandbox to production to fail, because usernames are different between production and a sandbox. However, according to one user's tests, the system behaves as expected when metadata is migrated in the other direction. A sandbox refreshed after the metadata is deployed will have its username automatically updated to include the .mysandbox extension. Ultimately, this means that we have to deploy the metadata to production through VS Code, where we can remove the sandbox extension when we're ready to go live.
In addition to changing the running user, you can set a reduced batch size for the platform event delivery system. The default is to process 2000 events at one time; this usefully allows delivery to handle smaller chunks. platformEventConsumer should be set to the name of your apex trigger (without the .trigger suffix). the masterLabel can be any human-readable name for the configuration.
Deploy The New PlatformEventSubscriberConfig
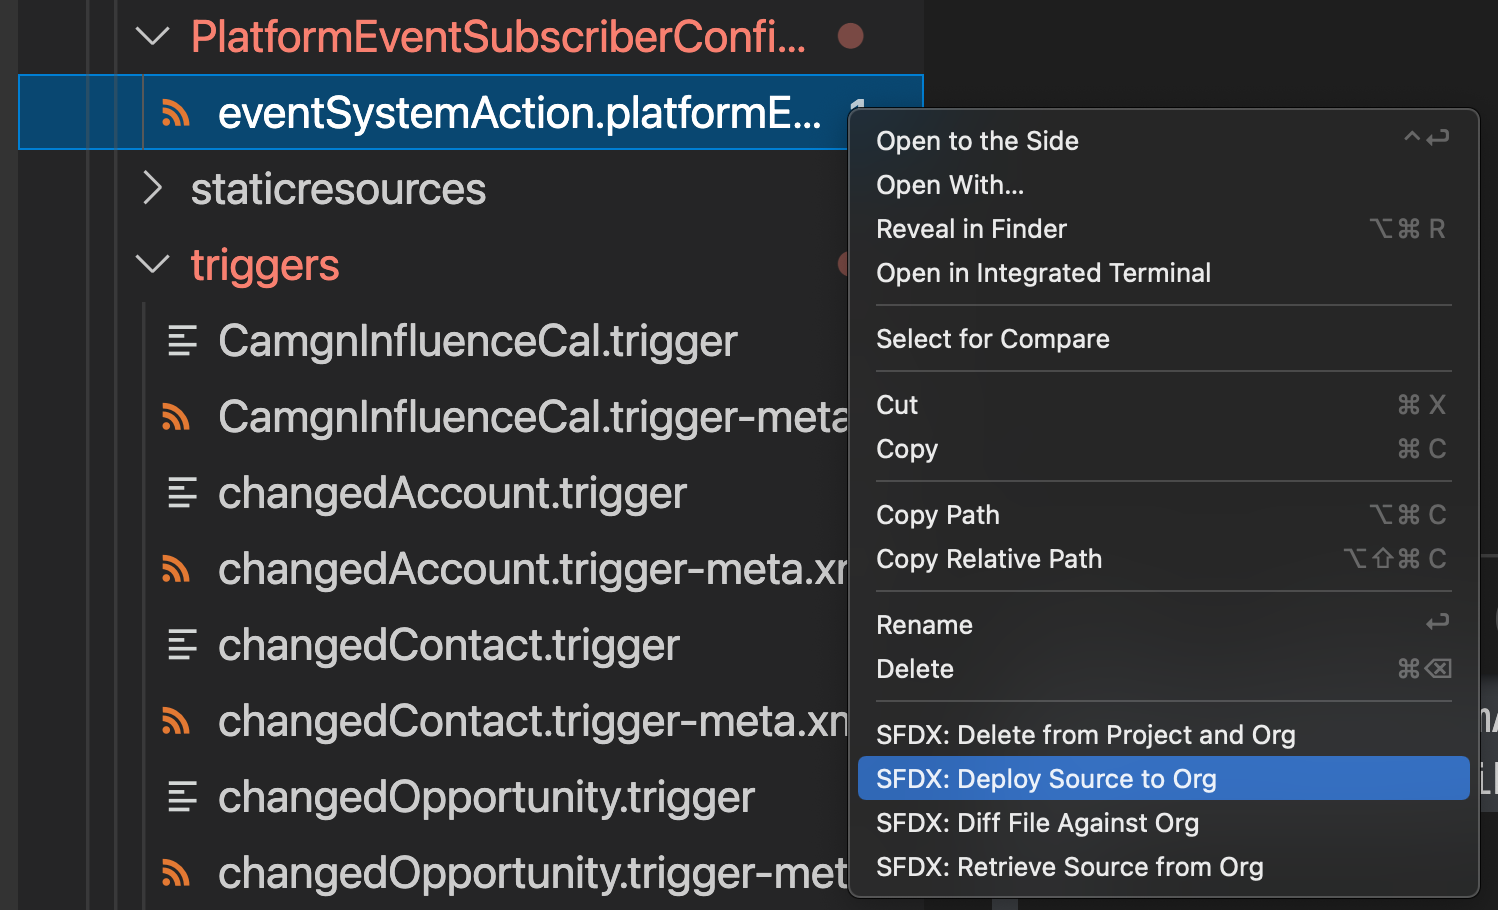
When you're ready to test your configuration, you can deploy the config via right-clicking on the metadata name in the VS Code sidebar, and selecting "SFDX: Deploy Source To Org".

The above deployment procedure can be used for deploying to both your sandbox and your production orgs. As described above, you need to deploy to production through VS Code, not through a changeset, so that you can change the username to a valid production user. To deploy to production, simply run "SFDX: Authorize An Org", choose "Production", and enter your production credentials in the Salesforce page that comes up. Once this is done, update the metadata's user tag to the production user, then run "SFDX: Deploy Source To Org" again. Be sure to re-authorize your sandbox afterward, to avoid accidental deployments to production.
Suspend and Resume Trigger Handler
After deploying to an org, you may need to suspend and resume the trigger handler before the changes will take effect.
- Navigate to the platform event's page
- In the "Subscriptions" related list, click "Manage" next to the trigger.
- Here you can suspend and resume the trigger. Note, resuming the trigger can take several minutes before the trigger begins processing events again.
I hope this helps! Here's some additional documentation that I found useful:


